Pages

Wednesday, 26 February 2014

WIP Wednesday - Checkerboard & Hearts Border Baby Quilt


I'm still working on hexies, they are not finished yet though I now have a cloud to go with my kite, some flowers and a bee!  But I decided to take a break from them and make up the first border on my medallion quilt for the MQG of Ireland Medallion-A-Long.  The guidelines from Catbird Quilts for the first border is to have it maximum 4" so with my dimensions of 18 x 24 three seemed a good number.


So I cut strips 2" wide in the pale pink and blue from some fat quarters of Tailored by Annette Tatum.  Cut them 2" wide and made 12 for the top and bottom border and 16 for the sides.
 For the corners I had the idea to add a heart.  As they are 3.5" unfinished, 3" when sewn in, I thought some of the corner pieces that define a heart shape would be very small so the easiest way to make them would be to paper piece them.  My first attempt was a little too angular and not quite heart shaped so I modified the top a little (bottom heart on the picture) and was much better.

I sewed the squares into 4 patches and here they are so far.


The border is not yet sewn into the background fabric and I need to sew on my hexagon shapes and add some grass for the flowers but getting there!


I need to remake the bottom heart as it was made with template #1 and I should have just enough to do it.  I was a little worried I'd run out of fabric on this border. Medallions use a lot more than you would initially think! Then again there lots of seams in this chequerboard but I like the effect.  


The template I made from EQ5 is here if anyone wants to make 3" hearts!
Linking up to 
WIP Wednesday at Freshly Pieced
Sew Fresh Quilts

Monday, 24 February 2014

Stash Bee February Block


The last Bee block for February is this Broken Wheel block for Sarah at Confessions of a slacker mom.  Sarah chose a colour scheme of blues and greens and requested the block with either colour and brown at the corners. 


The block is made up of 4 oversized corners trimmed down to size.  There is quite a bit to be trimmed and I had a little difficulty with the first corner.  The sucess of matching points was not dependent on pinning but on correct trimming.  I got the remaining ones spot on but the first one not at all! 


Sarah wanted seams pressed open and it really made matching points and lining up rows very easy.  This is the first block I've made where I pressed everything open.  I normally press to the side!

Having seen brown and blue used a lot before particularly in traditional style quilts I didn't realise how nice a colour combination it really can be. The fabric in this is Kona Azure for the blue and Forever Spring by Nancy Halvorsen for the brown.  I think its a really lovely combination.

The bottom right hand corner is the one I had trouble with.  Sarah was happy to receive as is and its gone off in the post now but the more I look at it the more I wish I'd remade it - Sorry Sarah!  Hopefully when it's quilted up and all crinkly it will fade into the background.

The tutorial can be found here on Stash Bee Hive #10.  There are 12 hives each posting a block per month so lots to chose from if you are looking for inspiration for your next project!

Friday, 21 February 2014

Library Project update!


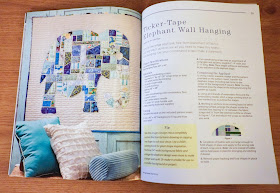
Can you spot the Basset Hound amongst these scraps?  I pulled a few scraps  (these are Karavan by Valori Wells) and placed a few here and there to see if these will work for my Wilbur the Basset wall hanging and I'm pretty happy with them! I've hand sewn a Basset outline with Perle cotton (earlier post) and am going to fill him in with more of these scraps.  This is one of my projects for the Library Project link up, inspired by an elephant design in Scrap Happy Quilting.
Adrienne at Chezetcook Modern Quilts has a linky party encouraging us to make stuff from the books and magazines we buy, instead of just browsing, admiring and putting them back on the bookshelf.  I love this idea.  I've tried to pick smaller projects that I could work on in between quilts.  I have 1 work in progress, 1 finished and 2 not yet started!

This one in progress uses the Ticker-Tape technique.  It's really neat and I'm going to do it as a quilt as you go to add the scraps.  I found 2 tutorials that explain this approach really well.  One from Stitched in Colour and one from Crazy Mom Quilts.  Apparently this is addictive and I can see the attraction already.  A really fun project so far!


I do have one finish to share with you.  I made a patchwork charm bag and the last post had it nearly done, only needing some binding and a button - ta dah!  All buttoned up now and finished!


This project was from Creative Quilting and uses 30 charm squares ( a 9 patch for front and back, 6 patch for flap and the rest for the strap!) so is very economical to make.  It is a surprisingly roomy bag and I can get a small laptop or net book, phone keys, wallet and camera into it!  The fabric is Spa by Deb Strain with lemon solid to contrast.  It's a bit summery for this time of year but I hope to use it for carting bits and bobs to Thursday night sewing meetings.

It came from Creative Quilting magazine and I followed the instructions without making any changes.  If I was to make another I'd make a longer strap but that's about it.  Everything else was spot on.

I'm really enjoying these smaller projects.  Nice to have a finish under my belt for a change!  Linking up to Finish it Friday and
Chezzetcook Modern Quilts

Wednesday, 19 February 2014

WIP Medallion Baby Quilt

It's a real work in progress here today.  I'm making my centre panel using hexies for the Medallion-A-Long hosted by the Modern Quilt Guild of Ireland.  It's open to anyone to join in.  It's tons of fun but I'm a little behind schedule.

I'm supposed to have a centre panel and the first border on by now bringing this up to 24.5" square.  Well, I'm not following path 1, I'm doing the slightly improvised while still following guidelines path 2!  My centre block is rectangular measuring 18.5 x 24.5" already without the first border on and will hopefully measure 24.5" x 30.5" when border 1 is done.


I have a balloon and a kite all basted up and ready for joining.  I underestimated the time it takes to hand piece hexagons so still working on these guys!

There will be clouds in front of the sun (this is Ireland after all!) and I found this lovely cloud like fabric in a new bundle of Tailored by Annette Tatum.  I bought this on sale from Craftsy and it has lovely pastel colours going through.  Very baby quilt friendly.


 The guidelines are to introduce as many fabrics as you want to use in the quilt in the first third and as I'm making this from a mixture of scraps and stash I've gone a bit mad.  I've got multi-coloured flowers and will have 2 little bees from the pastel fabric buzzing around them.

So far the plan for the first border will be a chequerboard with hearts in the corner.  I'm going to need 3" hearts so I'm hoping to draw up a template and paper piece them! 
 So a bit behind but making progress.  Linking up to Modern Quilt Guild of Ireland and
WIP Wednesday at Freshly Pieced
Sew Fresh Quilts

Monday, 17 February 2014

Design Wall Monday - February Bee blocks


Seeing as February is a short month I thought I'd better crack on get some Bee blocks done.  Aylin who blogs at aylin-nilya picked a lovely 4.5" block, very like a rail fence block but with low volume on either side of a teal/lime stripe with some hot colours like orange and pink to mix it up a bit!

Her idea came from a quilt design by Cottiello called Domino Quilt.

I really like Aylin's colour choices.  She wanted bright and I think they just pop off the design wall, and really easy to do, no matching seams on our end as Aylin wanted them stitched together in a straight line.

Imagine rows of these.  I think this will be a lovely quilt top when its complete!

So on a roll I kept going with Aurifil Spool Blocks for Cindy.  These are for the Modern Irish Bee hosted on the Modern Quilt Guild of Ireland page.  I love these blocks.  They were great fun and really do look like spools of Aurifil thread.  The tutorial for these is here


Cindy gave us a choice of what to make so I opted for 1 large, 3 medium and 5 small.  All the block colours came from scraps and the red for the spools was sent to us by Cindy to tie the whole design together.


Chain piecing them made the process nice and quick.


I really like this pattern of blocks, so looking forward to seeing the finished quilt.  I seem to have gotten carried away with the yellow.  Cindy wanted monochromatic and it was the biggest piece I could find for the large block.  It looks great against the red and so cheery!


The beautiful morning sunshine gave lovely light for the photographs and my helper Charly abandoned her usual hidey hole on top of my stash box for the windowsill to keep an eye on outside.  Don't ask me how she got up there!


Linking up to Design wall Monday and
stitch by stitch

Thursday, 13 February 2014

Colour theory


Two of the free programmes that we are exploring in Stiched In Color's class, Color Intensive, are the Palette Builder by Play Crafts and Kuler (also available in an app) by Adobe.  I've been having great fun with them, getting carried away to be honest!

One of our tasks was to make a mosaic colour wheel and to have fun exploring colour schemes.  I loaded my mosaic into the Palette Builder and it picked out the following colours automatically. 


You can move the selections around and set it to match your picks to Kona colours and add in some more  up to 10 selections.  I absolutely love this program!


The Adobe Kuler website allows you to play with the colour wheel and use colour schemes to build a palette, like complimentary (opposites on the colour wheel e.g. green+red) or analogous (next to each other on the colour wheel)

or triadic (3 points equidistant from each other).  I love how this last one just jumps out especially the blue/greens. 

In addition you can pick odd combinations like compound or do your thing in a custom setting.


If you want to adjust a colour you can click on it to highlight it and use the sliders to change the hue and the saturation.  It's great fun!  You can save your palette and share it with others  and explore what others have done. There is also an option to add a photo similar to PlayCrafts and pull colours out so I did it again with my mosaic above.


The programme can automatically pull colours from your image and you can play around with them in edit mode. 


And if you want to know what Kona colours these correspond to you can grab a screenshot and up load that to Palette Builder! 

Colour choice is a very personal thing.  You may have noticed I've been using lots of blue lately!  I've tried hard above to try and use other colours and I had tons of fun!  Next time you are looking for colour inspiration why not try the Palette Builder or the Kuler website, or both? 

And I just couldn't resist leaving you with this!  Not sure I'll ever make anything with this many browns but I really like that Windsor Blue.  There's no hope for me!