Wednesday, 28 January 2015

Free Motion Quilting Tension

Well my happy clappy, the world is alright with me mood, from my post on Monday, didn't last through the week.  For the last few days I've been battling tension problems!  I'm finishing a quilt for a Fat Quarter shop blog hop next month and decided now would be the perfect time to learn how to do posh swirly flowers (as opposed to the cute loopy ones!)


So I doodled while watching Wolf Hall with G and the dogs all curled up on the sofa and played with scale and added in loops to travel.  I did manage to get stuck a few times with dead space but practicing first on paper helped immensely.  Then I made some practice pieces, to quilt on my big Husqvarna Viking.  All looks lovely on the front but got this on the back:

The usual eyelashes when going around in a circle I expected, (I've been told its hand movement out of synch with foot pedal speed), but not the bobbin thread lying on the back of the quilt in the straighter areas.  All looks like its just resting there to me.  So I did the usual, clean the machine, oil it, re- thread everything, changed needle and no luck.  Increased the top tension - still no luck.

So, then I hit the search engines and read lots of advice, some of which is to try it in straight stitch mode and if that works ok, then its not the tension but the speed of my hands.

Try quilting with the feed dogs up.  My Husqvarna Viking doesn't allow a 0 length so I tried it on 0.5.  A little better but not much.

Change from fixed embroidery foot to hopping foot.  I tried the purple big foot and that was worse!  I went through 4 more practice sandwiches and was still not too happy with it.

A bit perplexed, I decided to try a practice piece on my small Pfaff which I've used to quilt smaller items.  I love this machine.  It's my take everywhere and I use it for almost all my piecing.  (I can get a better scant 1/4" with the HV though for some reason!) 

So off I went to practice sandwich number 6 on the Pfaff.  Much, much better.  Still need to get better control of my hand speed but at least there were proper stitches on the back!


So thinking its not just me, (though I'm not great at going slowly), I contemplated for a bit trying to wrangle a throw or bed sized quilt through the 5 1/2" space on my Pfaff.  Then I came to my senses.  I have an 8 1/2" machine I bought for bigger projects - make it work!

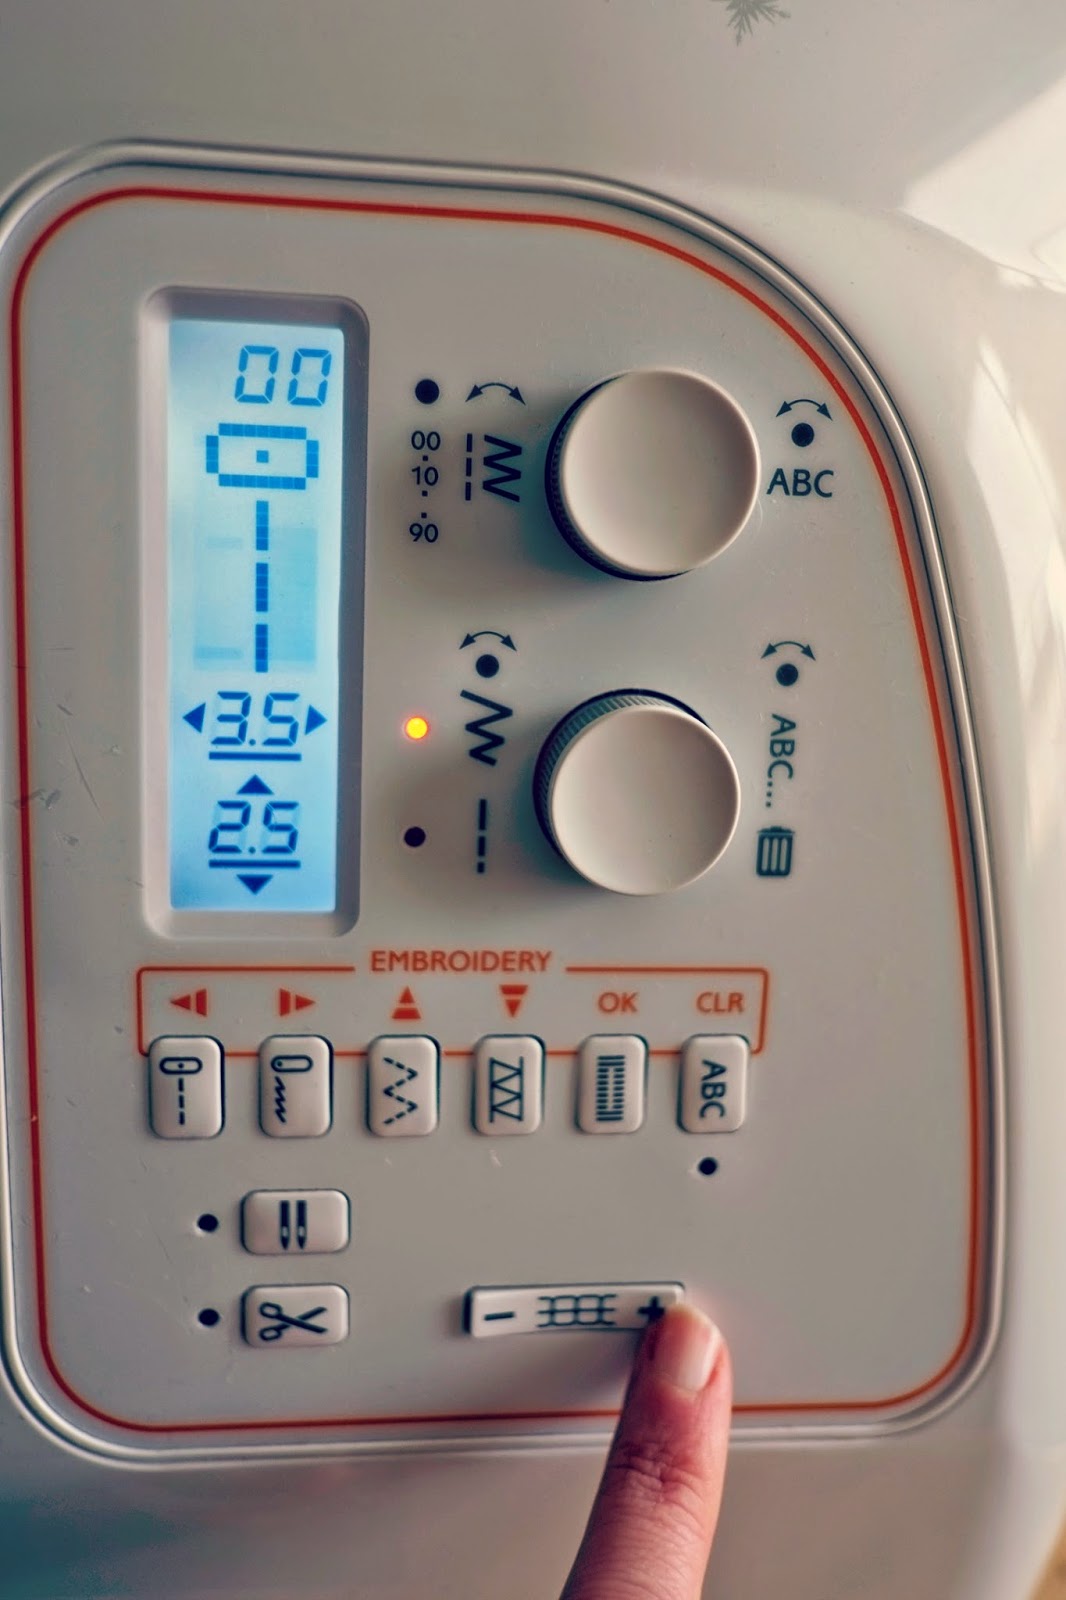
I eventually did what I probably should have done first and read the manual!  Turns out my machine automatically sets tension for the stitch type.  (It has an embroidery function too and the tension is set when you plug the embroidery bed in.)  You can override it with buttons on the front but your presser foot has to be in the down position for this to work.  Thinking I had an aha moment I increased tension with the foot down and then the thread broke!  Twice.  Grrrr.  This machine just does not like to be messed with.


Even though the manual says don't touch the bobbin tension I gave in and borrowed a tiny screwdriver from G.  I've read to turn it a 1/4 at a time and test.  Eventually after 1 complete turn to the left I got better results front and back.  This is what I'm sticking with for now!  Of course when I want to make some labels and use the embroidery function I'll have to change it back.  Wonder how much a bobbin case costs, might need to buy another.  Anyone do that , have a spare on hand? 


So I'm finally motoring along now and have plenty of practice at swirly flowers before even touching the quilt!  I've gotten more confidence and am increasing the scale of the flowers (otherwise I'll be all year quilting it!).  I am loving these titanium needles I got on a massdrop offer and as always using Aurifil 50wt thread (my favourite light pink colour 2410).


The fabrics are Amy Butler which I've not used before.  These pretty fabrics are a bit fussy for my normal taste but I love the oriental feel to them.  This one reminds me of the Temple of Heaven in Beijing.  4 of us went to China on a 22 day holiday a good number of years back and this quilt is destined for one of them - can't say who as they might be reading! 

Gratefully linking up to
Sew Fresh QuiltsWIP Wednesday at Freshly Pieced

Monday, 26 January 2015

Night Sky Finish

While most of this month I have been working away on projects I can't share just yet, I am happy to say the Night Sky Quilt is finally finished. I didn't get it completed in time for December 25th but did manage to finish it yesterday for January 25th! The pattern is Camille Roskelly's and can be found on her Thimble blossoms shop here.


When Jana asked me if I wanted to take part in a Quilt-A-Long to make this I instantly said yes.  I love Camille Roskelly (have 2 of her books!) and wanted to make a Christmas quilt.  This seemed perfect for it.

The pattern is made up of 8" and 16" sawtooth stars and as I was making mine from scraps, (Joy by Kate Spain, a little bit of Riley Blake, some new Folk Art Holiday and leftover solids Kona Navy, Snow and Ash), I was happy enough to make a smaller size.

Much and all as I love the look of this quilt, the repetitive nature of so many 8" blocks makes me happy I made a child quilt or throw sized quilt.  Leaving out the last column and the two bottom rows gives a 48" x 56" quilt and was perfect for the scraps I had on hand.


This is destined as a late baby present - sorry Charly you can't keep this one (even though I quite like it in the study too!)

There will be a final link up on Jana Machado's blog for the Quilt-A-Long finish over the next few weeks and linking up to the Friday Finshes this week at Crazy Mom Quilts, TGIFF and Can I get a Whoop Whoop!
And finally, this is one of my goals for A Lovely Year of Finishes and Finish-A-Long 2015 so quite a bit of motivation to get his one done!  So happy to have this first finish for 2015 done and dusted, a happy way to start the year.

My Button2015 FAL at On the Windy Side


Monday, 19 January 2015

Make Modern Magazine & Pattern Release

It may have seemed a little quiet on the blog but it's not due to lack of quilting related activities!   Last year, Make Modern Magazine published my colour block pattern called Storybook. 

It gives instructions for a baby quilt (40"x40") made from 5" charm squares and a bed size quilt (90" x 72") made from 10" layer cake squares which I made for my mum.  I love how it looks in her bedroom and keep wanting to steal it back!

I've had a second design accepted and am working hard on that at the moment for issue 5.  It will be an 84" x 84" (biggest quilt I've ever made myself!) based on this arrows idea I shared last year in the Around the World Blog Hop.  I can't show you pattern or in progress details on this one just yet but I'm making good progress.

In the meantime, Make Modern have reduced their subscription prices and are now offering individual magazines at $6.95AU, about €5 which is a great price for a quilting magazine! 

One of the other big pluses about publishing patterns in Make Modern, is that after the issue is replaced by the next one, the pattern rights revert back to the designer. 

So, I now get to sell my pattern on my own blog!  I re-formatted it to add more detail for the layer cake version and lots of photos.  Suzanne, in our Just Threads sewing group comes from a Quality Assurance background and inspected the language and instructions thoroughly!  She even made a quilt!  Suzanne added in some solid fabric to the outer border and had some charm squares left over to make a cushion.  Fabrics are Good Fortune by Kate Spain and I love Suzanne's swirly quilting!  Thank you so much Suzanne!
  

Due to the EU VAT laws, I'm offering the pattern through Payhip (who look after all the VAT for me!) and have updated the blog header and added a new Pattern Shop page. It's all very exciting and I have to thank Kristy, Jane and Lara at Make Modern for this and placing me on the path to writing a pattern!

The blog header images are licenced from Clipartof.com and as soon as I saw the Jack Russell and Basset Hound images, I had to buy them - they are the spitting image of Charly and Wilbur and even capture their personalities perfectly. 

So while I get cracking on finishing pattern number 2, I hope you will visit Make Modern Magazine and their blog page where you will find previews, prizes and guest posts.

Linking up this week to Thankful Thursday @ Quilting Jetgirl.  Next week, fingers crossed I'll have a Night Sky finished Quilt to share in time for Jana Machado's Quilt-A-Long on the 25th.

Tuesday, 13 January 2015

Schnitzel & Boo Mini Quilt Swap

When I shared a photo like this one on Instagram describing how much fun I was having shredding fabric I got some very quick reactions.  The fabrics were from my scrap basket of prints and solids so not the end of the world if my exploration into confetti quilting didn't work out!


I had an idea for the quilt I wanted to make for the Schnitzel & Boo round 3 mini swap but it didn't seem to fit right with my partners taste in fabric.  My swap partner is a big Lori Holt fan liking white backgrounds and clear bright colours.  So instead of an orange peel multi-coloured project I decided to give this technique a try. 

I saw this project by Kerry @ Pennydog Quilting in this months Popular Patchwork magazine.  It involves chopping up fabric with your rotary cutter and using fusible to hold some of the pieces in place.  Cover with sheer net and quilt over it. 

I really liked the idea of it for clear bright rainbow colours so thought I'd go for it with letters instead!

I printed these using a font called Berlin Sans FB Demi and used them to cut templates from fusible paper and trace on the fabric background (Kona Snow) with an air erasable fabric marker.  It allowed me to place the fusible letters and then sprinkle the fabric pieces in place.

I initially thought about using the water soluble stuff that you quilt over and then washes out but i couldn't find any so I stuck with Kerry's instructions and bought some fine lightweight tulle that is used for wedding veils!  It practically disappears over the bright white fabric.

To keep it in place I handstitched around the letters with perle cotton.  I hoped this would give the letters some definition too.

I did get a good bit of pulling  and puckering after the handstitching and was a little worried at this stage that this letter idea was not going to work!  I may have overstuffed them a little bit too!

Thankfully after trimming around the letters and cutting into the net the tension in the piece relaxed quite a bit.

I was quite careful on the basting too and spray basted the back, wadding and top together.  Then I made sure it was a smooth as could be and pin basted near the letters too.

It worked a treat and flattened it back into shape!

Even under the net the pieces move quite a bit so a dense quilting pattern is recommended.  I decided I'd try coloured matchstick quilting. 


I had previously made a cushion and used this technique with just white and quickly got bored with it.  Changing up the colours and straight line quilting this small piece went very quickly and was really lots of fun!

I used 9 different threads, 3 variegated and 6 solids in colours close to the rainbow letters.  Threads were Auriful 40wt and YLI 50 wt.   I used a light and a dark and spaced them 1/8" approx apart.


This round in the Schnitzel & Boo mini quilt swap is trying to support animal rescue which is a subject near to my heart.  Our Basset Wilbur is a rescue that was very close to being put to sleep.  If it wasn't for the volunteers and kindness of Ash Animal Rescue, Wilbur would not be with us. Even he decided to leave his mark on this quilt!  


Every now and again Wilbur gets bored of sleeping and eating and wants some attention (Bassets are incredibly lazy dogs!).  He has a long bony nose that he likes to stick under your arm and flip very quickly into the air.  It's funny most of the time except when you have a cup of tea or are quilting.  There is one really wobbly line because of this that I'm calling the Wilbur wobble.  As it is a special cause we are supporting I decided to leave it be and not rip it out!


Charly, on the other hand, spent the day watching out for the neighbour's cat and tearing into a new toy my cousin sent from the states as part of a Christmas parcel.    The rest of us were ignored completely!


Leaving me to crack on and finish the quilting complete with Wilbur wobble.  I was quite surprised by how much the letters changed with the matchstick quilting.  They got well and truly squished and G in our sewing group described them as organic looking. Not what I expected!


I chose purple for the binding and finished it up with a label on the back prepared for the quilt swap by Ali.  I can't show you the label as it is a secret swap and this mini is going in the post this Friday! 

Really hope by partner likes this.  It's not quite the clean and crisp Lori Holt style that I intended but it was a real learning and quilting exploration all the same!  I did put a bit of work into it and tried my best to make it work.  I hope to make up for it by adding in lots of goodies.   Fingers crossed she's not expecting something completely different!

Wednesday, 7 January 2015

2015 FAL and ALYOF goals


2015 FAL at On the Windy SideThis year Katy @ The Littlest Thistle has passed the baton for Finish-A-Long 2015 to Adrienne @ On The Windy Side.  This will be my third year taking part and setting goals to finish projects quarter by quarter.

I can't say I am the most successful at completing my to do list - I do get things finished though it takes a while as I am usually starting more projects than completing them!  This year though I hope to be a little less distracted and dig in deeper exploring quilt design and the techniques used to make a quilt.  I really hope 2015 is when I get comfy with free motion quilting!

So the projects I hope to focus over the next 3 months are
My ButtonFinish Night Sky QAL - yes I have a quilt top.  This was one of the things I kept going on, a little bit at a time, over Christmas.  Hoping to have this quilted and finished to link up with Jana Machado for the 25th of this month.  This will be my January goal for A Lovely Year of Finishes too hosted by Sew Bitter Sweet designs.

Schnitzel & Boo Mini Quilt swap round 3 - this is my attempt at 3D letters using a technique from Kerry @ Pennydog Patchwork.  I may have over stuffed it a bit!  I hope to matchstick quilt this with varieagated thread to keep all the little bits in place under the netting.  Need to have this in the post by the 16th!

I have a pattern for Make Modern Issue 4 that's due at the end of the month too so January is pretty much accounted for - Really need to get cracking!  Can't wait to show you guys in March!


Hopefully for the rest of February and March I might be able to get some me sewing done!  I think I have enough Camera fabric now thanks to Serena and Claire's generosity and Yvonne's help tracking down retro cameras on Etsy to make a photo quilt all for myself.  Truly selfish sewing this one!  Big thanks to you guys for gifting me fabric and helping me out.  I know we often say quilters are givers but only because it's true!

I also need to thank Wanda @ Old South Fabrics.  I'm making this giant star quilt for our bed and decided I had to use Wrens and Friends fabric for it. 


I had bought some in a bundle from Fluffy Sheep Quilting and it was the perfect colour for what I wanted but of course I didn't have enough.  Before Christmas I scoured the internet and found some on Old South Fabrics and have to say buying from them was a pleasure.  Wanda was very friendly and helpful with shipping and even included a Christmas extra for me in the parcel.  Thank you so much Wanda, I will be back for more!

And lastly but not leastly, I want to get somewhere with my Japanese inspired quilts.  I hope to free motion quilt the applique one and hand stitch the second with lots of Sashiko designs.

That's plenty to be getting on with I think!  What about you, have you made your list yet?
Related Posts Plugin for WordPress, Blogger...