Showing posts with label Modern Irish Bee. Show all posts

Tuesday, 17 October 2017

Modern Irish Bee!

One of the last activities for Modern Quilters Ireland is our Modern Irish Bee. This year, our group of 9 have been making big blocks for each other 18 ½" in size. There have been lots of half square triangle blocks which are fun to scale up to big sizes.

If you would like to find the instructions for any of these come visit our facebook group: Modern Irish Bee.

Suzanne gave us a free form option, to make a block with an Irish theme that she will put together for the festival of Quilts in Birmingham next year and she left the choice and content of the block up to us! Having had a conversation with Suzanne about books, and having seen the cutest paper pieced book block from Tall Tales on the Honey Pot Bee facebook group, I knew I wanted to use that in some way. After all one of the things Ireland is famous for is our writers like Yeats, Joyce and Beckett. So I though books would work quite well.

The other thing we are famous for is our wet weather! And with hurricane Ophelia just having passed through the weather is on the tip of everyones tongues.  (We lost our satellite dish so very lucky that was the worst that happened! Watching the TV on the laptop for the moment!)

Almost every casual conversation on a normal day starts with chat about the weather too and the hundreds of ways to describe a rainy day: bucketing down, pi**ing out of the heavens, lashing, soft, floggging it, spitting it, rotten, drowning out, fierce, pelting down, hammering down, torrential, weather for ducks, a day for the fire, no drying out today, wetting rain(?) and my favourite – someone left the tap on above in heaven.

With that in mind I decided to make weather themed books so I have a rainy winter, sunny summer, autumn leaves and the spring you might say is the bright green text border that ties it all together! Yes I might be taking a bit of artistic licence with it but isn't that half the fun! The paper pieced book block is quite titchy so to make something suitable for an 18" block I made 3, trimmed to 7" x 4 ½" and surrounded them with white background fabric and a 1.5" green border! If you want to make something similar yourself, download the book pattern from Jodi's Craftsy shop here. I think it's the perfect size for a cushion and would be great for a kids room for reading activities and I can imagine a pocket in the back for a book too! Might just have to make another one...


Tuesday, 24 January 2017

Catching up - last of the round robin bee quilts!

Last year, we decided to try out a medallion round robin for Modern Irish Bee 2016. Seven of us came together for the challenge and slowly working through the quilts, I found myself on the last one. This is Mary's quilt and my turn was to add the final border to it!


I didn't quite get to it over the Christmas but it had been up on the wall looking down at me for the past month.  Time to get on with it and get her done!


I wanted to pull the black from the earlier rounds framing the sections out as a colour to use but didn't want to deaden the gorgeous grey and white frame Cynthia had added.  I pondered, I procrastinated, I avoided and eventually I thought, Triangles!


So I mocked it up on the computer to see how big the triangles would need to be, how many I would need and how many colours I could get from the quilt into the last border.  I came up with black corners to frame it and to get them to look like this I needed an odd number of triangles on each side.  The quilt measured 64" when I got it and I knew I'd need to make it a little bit bigger so the triangles would sit evenly across the length.  


Geometry on triangles is a little bit time consuming.  For equilateral triangles making them by cutting them from strips, you have to add 3/4" to your desired finished height.  The height of an equilateral triangle is equal to the root of 3 divided by 2 and multiplied by the length of the side of the triangle.  It can be head wrecking playing with the calculator trying out different sizes and calculating the finished width.  Thankfully Yvonne's spreadsheet available on her blog Quilting Jet Girl or to download makes trying different sizes so much easier!  So kind of Yvonne to put this together and share freely!


You just enter your numbers in the blue and it calculates it all for you!  I played with odd numbers of triangles and messed about with the heights to see what I could get that was reasonable to work with and bigger than 64".  I eventually settled on 6.75" strips giving a 6" finished height per side and using 21 triangles gave a pieced width of 69.28" from point to point which I rounded down to 69 1/4".


The white fabric border grew the quilt to the right size for the triangles and brought the quilt up from 64" to over 80"including the triangles.


The corners where 5 triangles come together at the white border was problematic.  I thought about mitred corners but decided too many points coming together so, I made a template and tried that with an inset seam and it wasn't great.  There was some trial and error with black fabric and in the end the remaining 3 seams were made by fudging it really!

I don't have photos to show as I was concentrating hard at this point and totally engaged in the task.  What I did was add an oversized black piece to the last triangle on the right hand side of each border piece.

I marked 1/4" in from the corner of the white inner border and sewed the triangles on right up to that marked point (middle image below). I added the second border piece on by sewing the triangles to the white inside border again just to the 1/4" mark on the upper corner.

Pressing the seam and flipping the border over allowed the yellow triangle to lay nicely on the oversized black fabric.  I was then able to turn the edge under a 1/4", press and glue in place with Roxanne's basting glue.  Flipping the border back again so it lay right sides together on top of the black I sewed along the crease of the glued triangle right down to the 1/4" mark on the white border and closed up the corner completely. It sounds fiddly but I got better results this way and 1 very good corner and 2 not too bad ones!  Final step was to square up and trim off.  Don't tell the quilt police - I am fairly sure this is not the way to do it but it worked!


Done and dusted!  Sorry for the odd photo angle.  At 80" this is quite big now and hard to photograph indoors (raining outside at the minute!)  It took all weekend to get this pieced and I am so glad its now finished and can be handed over to Mary this week!  I hope she likes it!

Linking up to the Friday finishes.


Thursday, 5 January 2017

Happy New Year and Back to the Drawing Board!


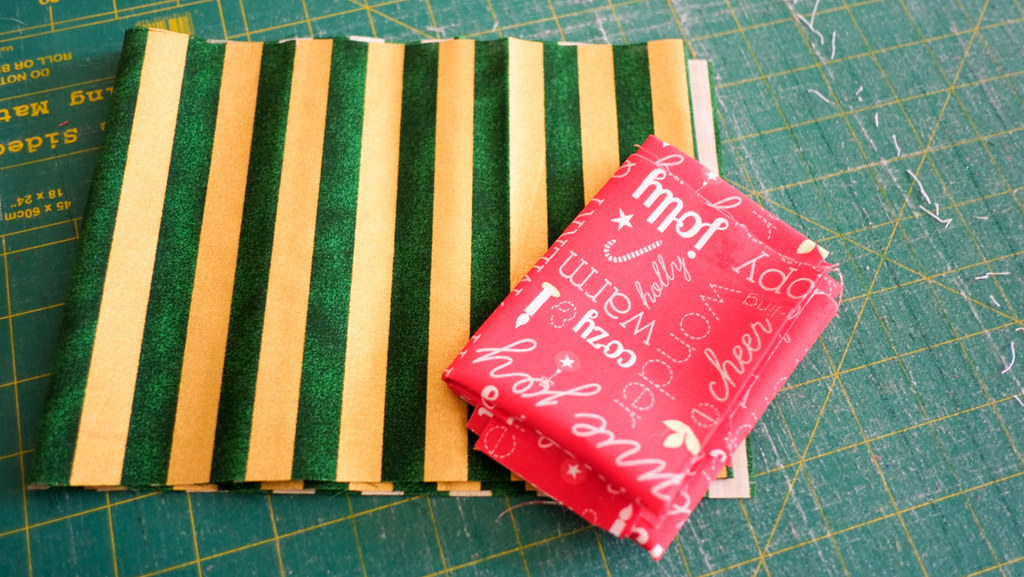
Happy New Year everybody! Hope everyone enjoyed the break over the holidays.  I had a wonderful time with family and friends and the only bit of sewing done was demonstrating how to use my first sewing machine to a friends daughter, (I gave her my Lidl Lervia machine that I made my first 4 quilts on!)  And I got a thank you present in return - hopefully she'll have great fun with it - she is certainly off to a great start!


In other news, it's not been a complete avoidance of sewing related activities.  I am on the committee for our branch of the IPS (Irish Patchwork Society) so one of the things I'm charged with doing is providing articles for our society newsletter (published 4 times a year).  Every quarter, I write up the branch news and one other article that might be of interest to our society which is a mixture of quilting styles and experience.  This month I have been working on writing about the Drunkards Path block.


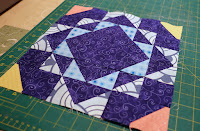
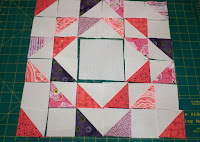
I think it has been on my mind as I am slowly getting to complete bee quilts from blocks received in past years and before Christmas made this little baby quilt and I am still thinking of the last 5 blocks as tall flowers!

For the article I have been exploring the shape of the basic unit of the Drunkard's Path.  It is basically a quarter circle pieced into a square shape.  The traditional ratios are 2/3 or 3/4 circle to background square.  A modern approach to the block is to use a full circle to background square as a finished unit in the block.


So I've been playing around with it a bit and love how 1970's the flower or vintage bloom block looks just by changing the ratio of circle to square. And adding a bit of colour gives a fun repeating pattern!


I am considering this as a block for Modern Irish Bee this year.  It's not my turn until later on in the year but we are going big this year with a maximum 18" block and this bloom block is a 4x4 patch construction and easy to size up to 16".

 
The wandering path home is a little bit lost in the first design but I think this one with a half drop repeat keeps the feeling of the traditional block design (supposedly named for the weaving way a person with too much of the merry stuff on him takes on the way home!)

And if they go by A&E on the way (kidding!) this exploded block with the 2/3 ratio gives a nice fractured approach!


Am I being a bit too cruel in asking a bee group to make a curved block?


To get that modern full curve look, it is easiest to make bigger and then trim back the excess on the outer piece to only the seam allowance after you have made your unit.  Allowing a good bit extra above and to the right of the blue lines helps handle the piece easier when adding on the convex curved piece so be generous with your templates!  Trim the excess away as the last step leaving only the seam allowance on both sides.


I learned this the hard way when, after resizing this design to a much smaller dimension than in Angela Pingels book : A quilters Mixology, I had a devil of a time getting the pieces curved and flat.  I ended up hand sewing this little guy in the end!


There is a cheat to making the Drunkard's Path units using applique.  Sew a circle onto a background square (reverse applique or mono-filament thread will hide the stitches) and then cut into quarters giving 4 units.  Trim afterwards to whatever ratio you want!  Maybe this could be a way to make the blocks Bee friendly?


Of course, having started to play with shape and colour and having more than enough for my article, I should have stopped but just couldn't resist a few more designs.


I'm quite liking this rope effect - can't see myself making that many curved pieces though the blocks are quite big 30" in this one below.  A bed quilt, Granny square style, in an ombre effect anyone?


The article for the magazine is now written and I need to get on with finishing those UFO's from last year, so this will have to sit for a while.  I really enjoyed this process though and this is what I had been missing towards the end of last year.  Just having fun and playing with shape and colour!  2017 is off to a good start!

Linking up with Let's Bee Social, Needle and Thread Thursday and Design Wall Monday!

Wednesday, 11 May 2016

WIP Wednesday - Improv Round Robin

This round of our Irish Modern Bee threw me quite a challenge. 

I have great love for improvisation style quilts and admire them afar. When I saw Cynthia's starting block pictured here at the top I thought cooooool, this'll be fun! Then it sat there looking down at me from the design wall asking me what was I going to do?

My fabric pull - closest I could get to Cynthia's block!
I tried sketching and extending the curved lines of the block and thought matching fabrics and seams would be a nightmare so I turned to Sherri Lynn Wood's: The Improv Handbook for Modern Quilters. When I bought this book I instantly loved it but to be honest found it a little intimidating. I closed the cover, picked it up, put it down, picked it up again and since it's been in my library of quilt books I must have flicked through it dozens of times.

It's a book you have to make time for, not for the reading though that is really enjoyable but for the doing. The book gives you Scores as in a musical score - the notes are the same but every performance is different. The projects are just beautiful and full of colour and your eye dances around the quilts. I love those kind of projects that just draw you in.

Like most things in quilting you just have to carve out some quiet time and give it a go. Cynthia's block forced me to do that and I am happy to say I had quite a bit of fun playing with improv curves. Rachel @Stitched in Color picked up the challenge of this book and is working through each score in the book with fantastic results. My little dip into it is making me itch to do a bigger project too though maybe not all of the book just yet!

So I decided on an imrov curves score, think of it as freehand drunkards path!

The score has you make a single freehand curve on a stack of blocks and re-arrange top and bottom pieces to sew them back together - then do it again and again and see what you get! Cynthia's block was based on 4 blocks, 8" in size so I wasn't sure what size to make to border the block but in the end trying not to overthink it I made bigger and trimmed my additions back to 8" too. That made 12 blocks around as a border. It's probably a bit big for a first border but I think it works and I hope it will give Mary some opportunities for adding to the next round.

Evening horrible night time shot but you get the idea!
I tried also to bring in some prints and lighter colours too in the fabics to make it easier for the next rounds. I played around with the layout and like this one, it has some colour clumping (a made up Ruth technical term!) I think it makes it seem a little more assymmetric than scrappy this way so I think I'll be sewing this together this evening and passing on to Mary on Friday! I think I might lend her the book too as it was such a great help and working through the score meant lots of concentration and no time to panic!

Best match I could get with the fabrics!

So now the design wall looks like this!

It's back to traditional blocks made modern for the next while but I think I'll be coming back to the Improv Handbook for Modern Quilters in no time at all!

Friday, 22 January 2016

Friday block finishes!

As I am not up to quilting my queen sized flower power on my small Pfaff, I have been getting on with piecing bee blocks.  I am totally in love with this block chosen for us by Kate in Hive 4 of Stash Bee. 
The red and white combo is just classic!  The tutorial for this one is over at Anyone Can Quilt.  I'm thinking about this for the centre of a Round robin quilt starting this month with Modern Quilters Ireland!

I managed to finish off the last of Modern Irish Bee 2015 blocks too so all caught up with that one!  Suzanne sent us the Green and Gold fabric and told us to make anything we wanted with it so I made Christmas presents for her festive themed quilt.
The blocks are from the free pattern by Kate Spain, called Flurry and can be found here on the Moda website.  I checked with Fiona @ Celtic thistle Stitches and Christmas bee blocks are ok to link up with Ho Ho Ho and On We Sew which is being hosted on her blog this month.  If you are trying to get ahead with Christmas makes or making up for a forgotten present from last year head on over to Fiona's where she has a collection of free tutorials with a Christmas theme!
Finally I have a block of the month club finish to share.  This is a block from Whipstich's Murder Mystery Blocks of the month.  This one is great fun!  You subscribe and every month you get a chapter of a story giving you clues to a murder mystery.  You also get a block to make and extra clues if you make your block on time.  You get one chance to guess Whodunnit and be in with the chance of winning a prize at the end of the year.
If you are interested head on over to Whipstich.  I'm really loving this one!
Happy weekend everybody!

Friday, 11 December 2015

I've been bee block busy!

Being in 2 bees I have 3 blocks to make every month - 1 for Stash Bee and 2 for Modern Irish Bee. I managed to keep up to date with Stash Bee but this month made a big effort to get all blocks for Modern Irish Bee made and in the post! So I have lots of blocks made but not yet shared.
Image text here Image3 text here
First up Stash Bee!  We had 2 people pick the same Ripples block from Gnome Angel designed for Hive Bee. The colours couldn't be more different but apparently my sense of photo taking is pretty much the same even though these were made 1 month apart! Creature of habit I guess - this was a surprise to me writing this post and I think I must make a better effort to change up the angles a bit next year!
Image text here Image2 text here Image3 text here

For September we were asked to make these really lovely tulips from Podunk Pretties.  I love these and can imagine them on everything from pillowcases to cushions to aprons to borders on a quilt!

For Modern Irish Bee Louise picked a Wheel of Time block in greys, aquas and oranges and Jacinta picked greys and lemons in her block for October.

I really like this one too and can't wait to see it finished into a quilt top. It's from Hyacinth Quilt Designs called Garden Fence.
Lastly for November, Stephanie picked the Patchwork wheel block by don't call me Betsy in bright scrappy colours.  This was the first ever bee block I made for Global scrap bee 2 years ago so I smiled when I saw this one pop up again!
So all caught up with Bee blocks and though Stash Bee 2015 is now at an end I still have December to go for Modern Irish Bee.  Suzanne gifted us some green and gold fabric and challenged us to make whatever we wanted for her Christmas themed quilt.  I have ideas!  I'm on a roll now and am aiming to get them made this week!
Related Posts Plugin for WordPress, Blogger...