Showing posts with label Tutorials. Show all posts

Wednesday, 18 May 2016

Ticker Tape Basset Hound - Here's How I made Wilbur in fabric!


Over the last few weeks, I have had a few people ask me how I made my Ticker Tape version of Wilbur, our Basset Hound.  I thought I'd write about how I made him, so if anyone wanted to make something similar they could!
I bought a copy of Scrap Happy Quilting and like most quilting books admired it, thumbed through it and put it back on the bookshelf.  Adrienne at Chezzetcook Modern Quilts had a quilt a long two years ago to get us using our Library books and I picked this project as something to try from the book.  Then we had a get together with the Modern Quilters Ireland group in Galway and I swapped it! It has a lot of colourful projects and you can buy the book as a PDF here.  Having given mine away I had to come up with a plan to do my own ticker tape project!
So of course I chose Wilbur!  Elephants are cool and I love them in fabric, so much so, it was because of this elephant print, that I bought my very first fat quarter bundle of Valori Wells fabric, called Karavan.
Having said that, any Basset Hound owner will tell you not much compares to a Basset, so I pulled out my scraps of Karavan that I had left over from my first pieced quilt and arranged them in a bassety shape and thought this could work!

The first step is to draw an outline on your background fabric of the shape you want to fill in.  Then hand stitch along that line with perle cotton to give yourself an outline to work with.
I had great fun sketching Wilbur and was very pleased with the head and nose but couldn't get his legs right so I turned to google and searched for Basset Hound Silhouette!


I chose the first image to work with from Silhouettes by Lena and used that as a basis to complete my design.  If the image is not in the public domain you may have to ask the copyright holder for permission to use their image for your work.
If you don't feel comfy scaling up an image by hand to draw on your fabric, you can do it on the computer easily enough and print your image across multiple pages.  Tape them together and you get a full size image you can trace.  The easiest way I found to do this was to save my drawing in Photoshop Elements as a PDF, then open Adobe Reader and print my drawing as a poster or banner across multiple pages.

Once you have your outline sewn on your background fabric you then baste your quilt top, wadding and backing.  My project was about 40" x 30" so I spray basted my quilt sandwich and that made it easier than having to remove and work around pins.

Ticker tape is technique that uses raw edge applique.  You sew through all the layers of your quilt as you are applying your scrap pieces. The idea is that the pieces fray over time and you get a textured effect.  I first tried a straight stitch and realised that 1/4" was too big a seam.  Reading up on it, it should have been closer to the edge about 1/8" or less so I ripped this bit out and went again but this time with a small zig-zag all around.  I got lucky with the eye fabric and am delighted how his head turned out.

Sewing through all the layers makes a really cool outline on the back of the quilt too!

I first started with laying pieces down and trimming around them with a sharp scissors using the perle outline as a guide for the outside edges.  For the inside edges I cut straight lines and left a small gap between the pieces approximately 1/8".


It got a bit messy with lots of bits and pieces on the floor but I really enjoyed the process and trying to fit all the pieces together like a jigsaw. 

I did try to use fabric colours guided my Wilbur's own colouring.  He is a tri-colour Basset so he has black, white and a beautiful reddy brown coat.  I used blue for the black areas, white and pink and mustard for the red/brown areas.

Even though I like the shades of pink, maybe that might be a colour choice I would change going forward as G commented that it reminded him of the butchers diagrams showing the various cuts of meat you can get.  Wilbur and I are ignoring that comment!  So ploughing ahead the final layout was like this!


I initially pinned the fabric in place but with all the turning through the machine zig-zagging the little pieces down it was easier in the end to use glue. 


I tried both fabric glue and fusible tape and the tape was the easiest.  I have since bought Roxannes Basting Glue and have had great success with it so I would probably use that next time instead!

If you don't like the frayed edges of ticker tape you could use Lara's no fray applique method from her new book Crafted Applique.  Lara's method would make this process very easy!  I'll be giving away a copy next Tuesday on the blog so please come back and visit.

Finally when all the pieces are secured, quilt to finish!  I used a wavy line just like the elephant project that inspired all this in the first place.  When washed it gives amazing texture!


So there you have it - Ticker Tape Wilbur!  I hope you are tempted to try your own ticker tape silhouette project.  If you do I'd love to see it!


Linking up to
My Quilt InfatuationSew Fresh Quilts

Friday, 18 December 2015

Friday finish and free motion bee & flower tutorials!

So my sewing machine has had a hiccup!  The bobbin has jammed up and no sew joy at all.  The shop I bought it from are on holidays until the 4th of January so it looks like it'll be hand stitching for me over the Christmas break.   In the meantime, I thought I would leave you with one last post showing how I free motion quilted some of the motifs in the mug rugs I made for Lara for our recent best swap ever!!!! 

rough hand stitching on the mini - before quilting

In addition to sharing with you guys process steps and inspiration for a project, this blog does me a big turn by being a place to record details that I can go back to, again and again, particulary if I am trying to remember where I found a block or pattern, or if I'm struggling to remember how to use a special technique.  I thought today I'd share some steps on the flower and bee quilting in these two little projects to save them for reference.


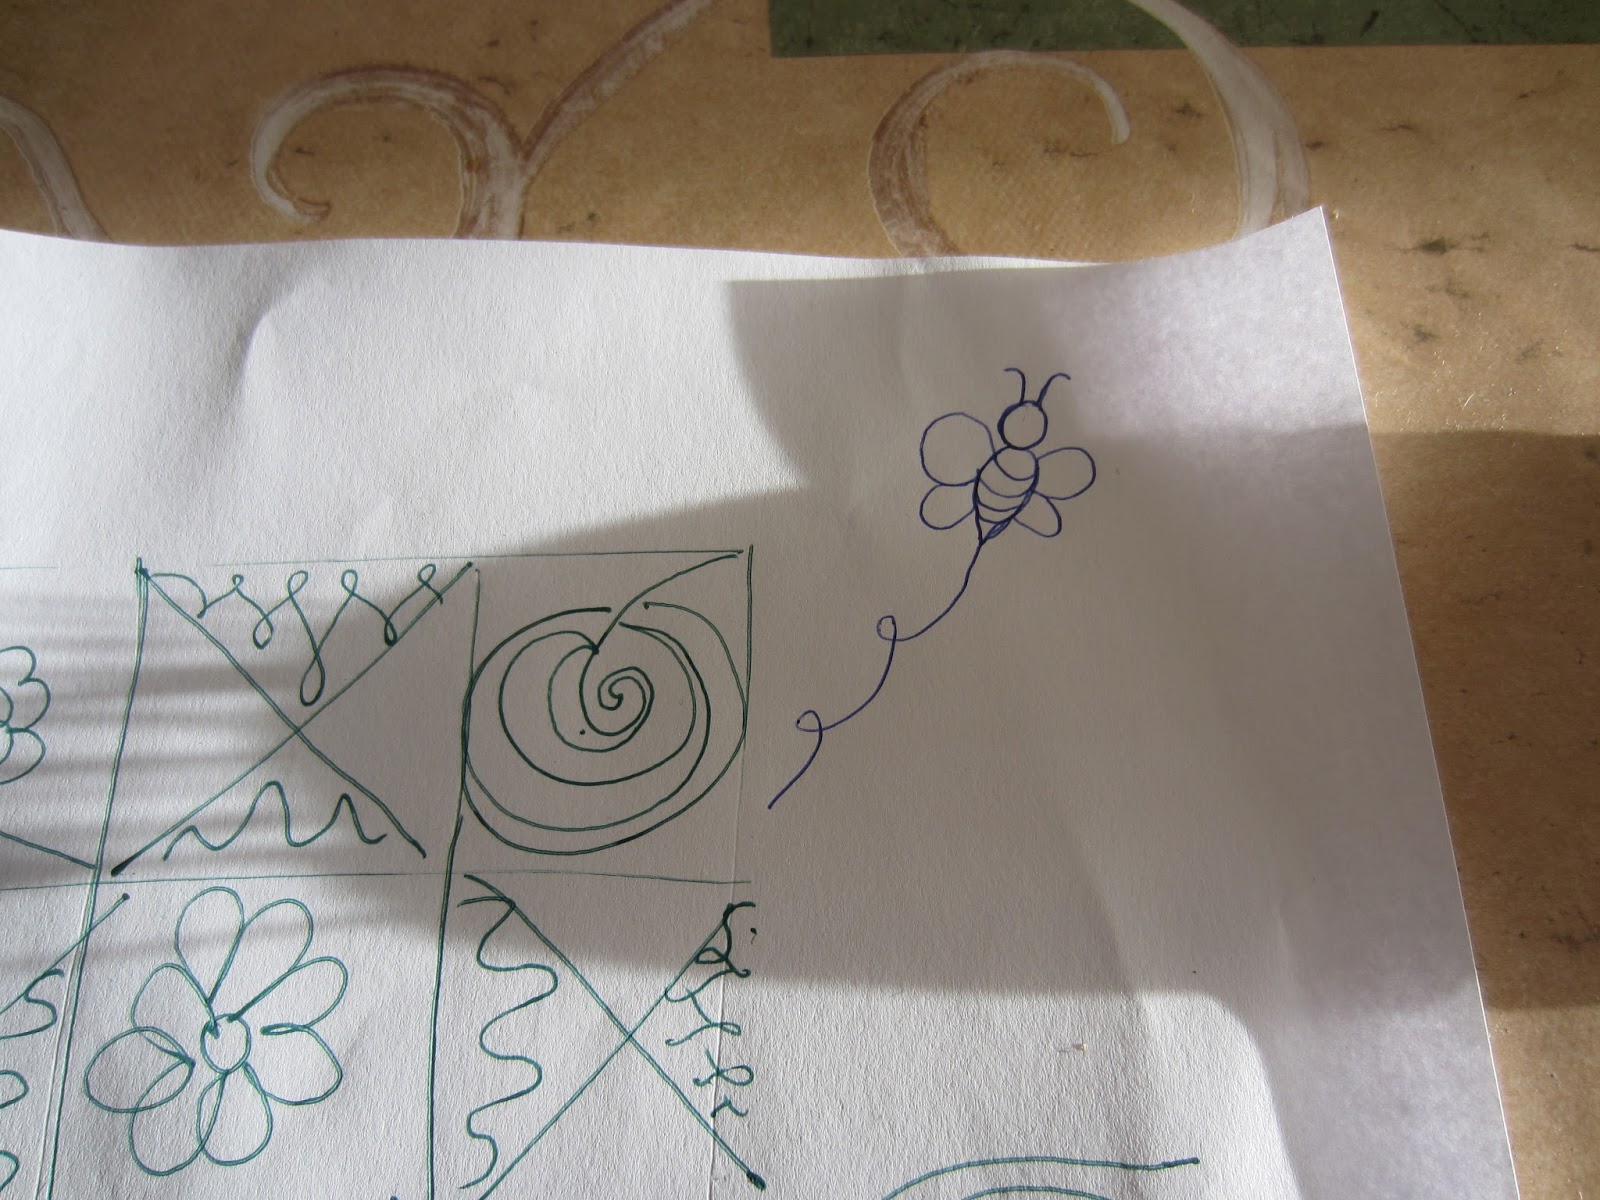
I'm a big fan of The Inbox Jaunt and love Lori's approach to doodling and how it can be used to make quilt motifs.  I've been trying to doodle more and had great fun practicing bee shapes before even attempting to take needle and thread to the mug rug.  I even googled how many wings bee's have and tried a technique Heather Ross recommends in her Creativebug class on fabric design.


The idea is to look at images of an object, practice drawing them to get the shape in your head and in your hands and then put those images aside, take a blank piece of paper and draw from memory.  That way you don't copy someone else's drawing and make your own. 

Following that technique this is how I quilted my bee!
The remaining quilting was just loops in a matching background colour and some steam from the tea to fill the cup.

Knowing how amazing Lara is at applique, I thought my rough and ready approach could do with some backup, so I found some pretty co-ordinating scraps and made a more traditional pieced mug rug to go along with the first one.

Fiona @ Betsy Grey Crafts had a de-stash on instagram and I picked this teacup fabric for the backs!

I had fun quilting this one.  A little bit of stitch in the ditch, some wavy lines, orange peel effect and a doodle flower!
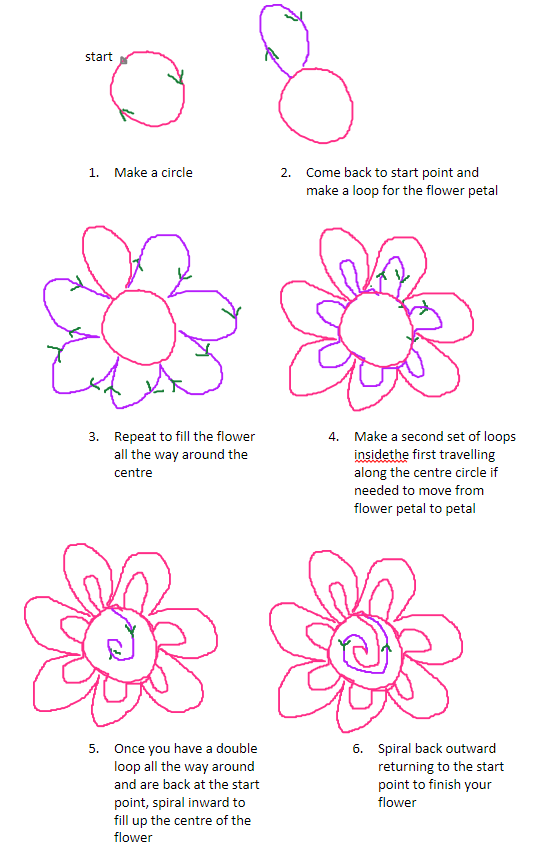
To make the flower I kind of made this up as I went along!

I like how it looks and think next time it would be fun to combine both the bee and the flower and make a garden of them!
So that's it from me for a bit!  Thanks for reading and letting me share my quilty adventures.  Hope everyone enjoys the festivities and has a wonderful Christmas and New Year's celebrations!  

Tuesday, 13 October 2015

Dog Gone Cute & Simple Free Motion Paw Motif Tutorial

 
It's my turn on the Dog Gone Cute Blog Hop today!  I've been looking forward to this one for ages.  Like many of us in blogland, when I first saw Lorna's pattern I was totally hooked and knew I had to make it.  After all these pups are the spitting image of our Jack Russell Terrier Charly.
And like many more when I first saw this pattern it reminded me of all our past pooches too and I was determined to make a memory quilt of sorts.  Using the smaller blocks in the pattern I made a block for our two previous JRT's Toby & Patch as well.
Same but different!
Over the last 28 years we have only ever had 3 weeks where we without a Jack Russell Terrier.    Toby was our fist Jack Russell and he used to have 1 ear up and 1 ear down so I modified one of Lorna's blocks for him.
When I was a teenager Toby used to sleep under my bed.  I woke one night and could hear breathing and you know when its dark and you just freeze and have to force yourself to be brave and look under the bed, well that's when I saw the furball snoring his head off!  That became his favourite spot and was very comforting, after the first shock to realise he was there!

When Toby died, a week later we got Patch who had a shamrock shape patch on his back when we was small.  It changed to a smudge as he grew so not the best choice as a name really! We had him for 15 years and it was funny, we babied him more as a senior citizen than we ever did as a puppy.   I'd put on an extra handful of pasta just for him!
I used to travel quite a bit with work and every time I'd Skype home, the first question I'd ask was how's the dog?  I didn't inquire about anyone else! 2 weeks after putting Patch to sleep we got Charly.

Seriously!  How does he fit in there?
Working out the design
Charly used to sleep on my stash until Wilbur stole her bed.  My blog is named after her as she is my little pal and finds a space where ever I am, usually on my lap or on the chair next to me when I'm sewing!

She is a very inquisitive dog and when she hears a noise she can't make sense of will do the really cute thing that dogs do: the head tilt .  She's super cute when she does it and I had to include it to make her personality stand out on my quilted cushion.  I oversized the block with background fabric and cut in on an angle.  Not sure if I shouldn't have given her more of an angle - it is quite extreme when they do it!

As we have only had 3 JRT's so far I put 3 hearts in the last corner as we love our dogs to bits!  G did ask which one the big heart is for and I may have given him the death stare look.   3 hearts for all 3 dogs not a big heart for anyone in particular...(not that I'll admit but I think you can guess!)

Charly went on holidays to 2 different houses while we were away in the states and neither would accept anything from me to thank them for minding her.  So of course I'm going to make something!  Originally I had planned on making Dog Gone cute for myself using aqua and pink on charcoal but have since decided I'll be making the pattern as a thank you,  I've only just started the cutting and will be a while yet (hopefully before Christmas!)

So here's my finished Dog Gone Cute Memory Quilt turned into a 24" cushion! 
And of course I couldn't leave Wilbur out.  I have all the instructions written up for a Hound Block and made some changes after making this one.  I've narrowed the head and widened the ears and just need to test some of the angled pieces for the ears this weekend.  I should have the block ready to share before the blog hop ends on October 29th in case anyone wants to make a long earred furball to go with their puppies too!
Wilbur I quilted with a meandering loopy all over pattern.  I think it gives really lovely texture in the face and reminds me of fur.  Something I plan on doing with the bigger Dog Gone Cute Blocks.
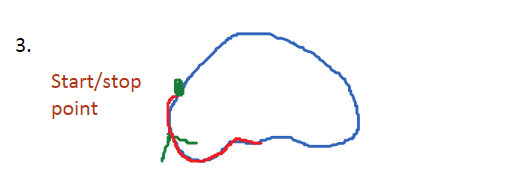
For my cushion using the smaller blocks, I just stiched in the ditch the faces and got brave and tried  an all over dog paw pattern in the background (previous post here).  It is a very simple free motion pattern and I thought those getting started with free motion quilting might like to see the steps I used to get this look, so have a short tutorial below:
Free motion quilted dog paw meander!
Tutorial:
Start with a wiggle /meander and come to a stop
From there stitch around a mushroom shape
Trace around mushroom to approximately half way up one edge
From the stop point in step 3 stitch a circle or oval to make the first toe.
Repeat for all 4 around the top of the paw.
Stitch all the way back to the start point and meander off again for the next motif.

If you want to keep this for later I have a downloadable version available here as a PDF.


Thank you Lorna for allowing me to be a part of this hop and celebrate Dog Gone Cute.  I had great fun playing with it and love my happy looking sofa!

To see more today check out my fellow blog hoppers at :
Tanya of Tanya Quilts in Colorado
Laurel of Quilts by Laurel
Kathy of Kathy’s Quilting Blog
Deb of New Creative State

Sew Fresh Quilts
Related Posts Plugin for WordPress, Blogger...