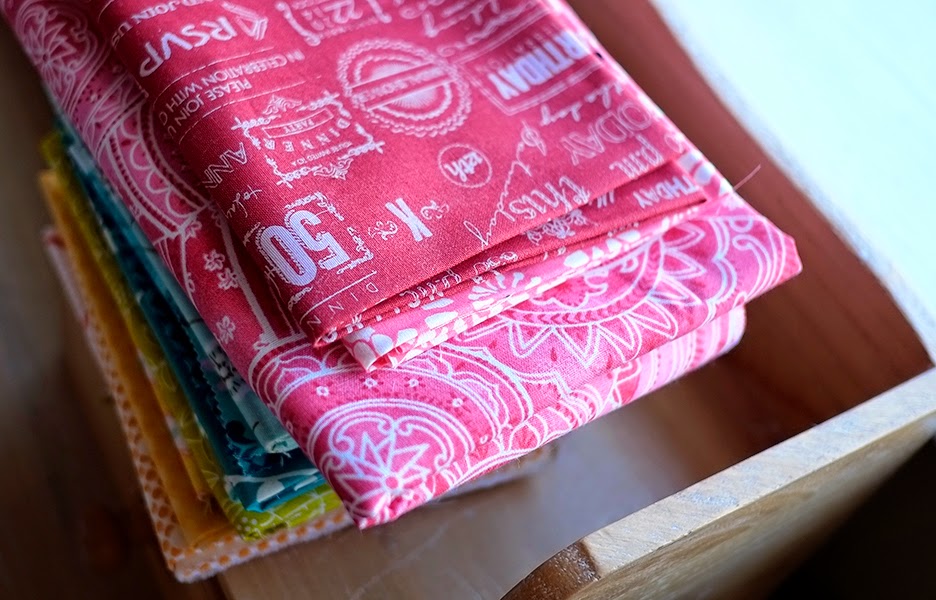
For the best colour accuracy and most pleasing images, it is best to shoot your images in natural daylight. Common advice is to take your photos near a window and use the directional light from outside to light up your shots.
The camera isn't as good as the human eye at seeing a wide range of tones from light to dark in one image and tries to average out the scene. Sometimes, when you have an image that has a lot of variation from light to dark or the light is very bright you can get areas of overexposure in your images.
In this photo of a fabric bundle, the top material is way overexposed. In the histogram (representation of tones in your image from dark to light) you can see this as the spike on the far right. We don't have a clean rise and fall of the curve at the white end but a sharp peak showing that the highlights have been clipped. We have lost information in this part of the image and detail has blown out to pure white.
Reducing the brightness in photo processing software will tone down the brightness of the image but can't put detail back in the top fabric. Once that information is gone you can't get it back.
Viewing the image in Camera Raw, we can see the over exposed areas covered by a red mask. Many cameras will show you these areas by hitting the playback button and reviewing your image. If you toggle through the display modes, most cameras will show you blinking white or red areas on your image. (Checking the image on the back of the camera is called chimping and checking for highlight clipping is called watching the blinkies!)
If you shoot with RAW files, Camera Raw can help recover some of this detail. If you shoot in JPEG'S, Camera RAW can't help as much but can help a little. (Remember Lightroom automatically uses Camera Raw and Photoshop and Photoshop Elements will allow you to process JPEG images in Camera Raw with the Open As command in the file menu).
Reducing the highlights down quite a bit makes a big difference in the image and brings in some detail. It is better but still not a great image. The most important thing to remember here is to try not to clip your highlights if they contain important information in your image. Once they are gone they are next to near impossible to recover.
So what can we do instead?
One of the things we can do is deliberately reduce the exposure and sacrifice some of the shadow detail to black. We can also change the angle we shoot at. This is still quite contrasty but a much better image now showing detail in the blue fabric.
If the light is very bright, we can diffuse it by placing a sheer material between the light source and our subject. Photographers often use a circular pop-up diffuser to soften the light and reduce contrast. These can be very handy if you take outdoor photographs of flowers on bright sunny days!
In our house we have a blind that lets in a lot of light through but I can use it to soften the light if it is very bright. Lightweight tissue paper would work too. The downside to this blind though is that at nightime, all my neighbours passing by, walking their dogs, can see me sewing away at the kitchen table!
The sun moves around our house with this window in shade in the mornings and full on sun in the evenings. The best time of day for me to use this window as my light source is early morning. If I need to take photos later on in the day I move towards the back of the house!
So if you are having trouble with too much light you might have fun trying out what window to shoot at, shooting at different times of the day, playing with diffusing materials and watching the blinkies to protect highlights in important areas. I hope these tips on handling overexposure in your photos help!
 I'll be writing a few more of these Photo Friday tips while the Plum & June Blog hop for new bloggers is going on through June and July. More next time!


Great way to describe exposure. I have a lower end camera, so RAW's aren't really an option for me, but yes to filtered light! Another tip I use when I have to resort to using my flash is to put printer paper in front of the flash to help the light be more diffuse and soft.
ReplyDeleteThanks, Ruth for the information. Although I can in theory adjust the light values in RAW, I'm nervous about making changes there. I prefer getting the exposure right to begin with. Your tips about using diffuse light and changing location and angle are really useful.
ReplyDeleteRuth, I bookmarked this page for future reference, because i sure could use this knowledge!! Thank you for taking the time and care to post such an excellent tutorial.xx!
ReplyDeleteLori
I'm always laughing at myself when I'm standing in the backyard with my camera, just waiting for a cloud to come by (of course, it was cloudy when I took outside my camera, but once the setup was completed, clouds have disappeared).
ReplyDelete