Showing posts with label Straight line quilting. Show all posts

Wednesday, 15 October 2014

WIP Wednesday: Quilting Triangles!

Last Christmas, I bought myself a present.  I joined a weekly sewing group and wanted a smaller machine that I could carry.  My normal machine is a Husqvarna Viking and it weighs a ton.  I had a disk problem in my back a few years back and I am very wary of carrying heavy sewing machines!  So I settled on this little Pfaff Passport 2.0.

I love this for piecing and when I used it during a free motion quilting class at the Limerick Quilt Centre,  Mary Palmer was impressed with the tension on it.  My Husqvarna always requires a tension adjustment for FMQ and piecing but it does have a huge harp space (between needle and body of machine).  Little Pfaff not so much, but I thought I'd use it for my triangle quilt.

I discovered that when piecing triangles you lose a lot of width when the seam allowance is sewn in.  Not so much on height but it meant my triangle quilt was a bit smaller than I thought it would be.  Suits me being 5ft zero but probably not most people!

Small quilt, small machine, I decided to try and give it a go.  Plus the Pfaff has a built in walking foot (Pfaff call it IDT).  I love this feature.  You just pull down a black plastic arm at the back and even feeding of the fabric from top to bottom happens automatically!


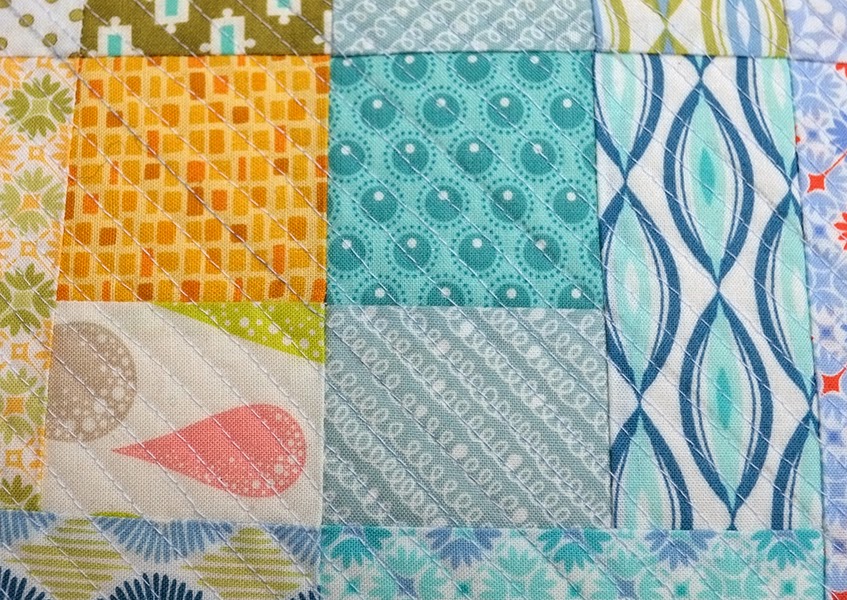
When I first looked at quilting this, I thought straight line quilting beside the seams was a bit too obvious and then as it's been hanging along so long, I thought obvious is a perfectly fine strategy to pursue, so straight line it was.  I broke my 1/4" piecing foot accidentally (had moved the needle for a zipper foot and forgot to move it back!) so I used the standard foot instead and it gives a line about 3/8" away from the seam.


I turned on the new season of Scott & Bailey to watch (UK detective series) and straight lined away.  I know some people enjoy this bit and zone out.  I have to confess I find it a little bit boring though I really like the look.


Even straight line quilting I found it easier to move the quilt with quilting gloves.  I use Machingers size small.  They give you a guide on the back of the packet to place your hand to see what size you are.  My friend Louise was advised to go a size smaller again as they stretch after a while using them and I can attest to that.  I kept having to pull them up, so on the list to buy at the Knitting & Stitching show are XS gloves!


Things were going great across the long diagonals mirroring the triangles and I was tempted to stop there after two lines crossing over.  This would have left me 9" at the widest space between the quilt lines and my batting is good for up to 10" apart.  As this is probably going to be washed a lot, I went for the last line echoing the horizontal lines across the quilt.  At this point I got a few puckers - maybe three lines crossing over was a bit too many to chance my luck?

It only happened in the yellow fabrics which are from the Minimalista range.  They feel smoother to the touch than the other fabrics and I didn't pre-wash as these triangles were from fat eights that I had starched.  The Florence fabrics I used, despite not having perfect points everywhere, glided over smoothly.  I'm happy enough with the result and figure in the wash they might disappear!


I originally thought I'd use black for my binding but when I placed it next to the quilt it looked too harsh.  I'm thinking a darkish grey would work better.  This grey seems a little too blue so it looks like I need to make a trip to the quilt shop and see what I can get to finally finish this little quilt. 


You may have noticed I didn't do a round up of Quarter 3 FAL goals.  Well, that's because I didn't finish any!  I did come close with 2 projects but fell shy of the finish line.  So this post is in Work In progress Wednesday rather than Finish it Friday!  Oh well, there's always this quarter!

Linking up to

Sew Fresh QuiltsWIP Wednesday at Freshly Pieced
My Quilt Infatuation

Thursday, 5 June 2014

Friday Finish - 3 log cabin cushions!


Remember the log cabin blocks I made as an exploration?  Well they are now 3 quilted cushions for the sofa!


Yes it has been a week of pillows around here!  A quilted pillow is a really fun quick project and I really enjoyed making these.  I'd been wanting to try out matchstick quilting so all 3 got the walking foot treatment!


The first one was quilted in a diagonal line.  I marked straight lines 1.5" apart to keep me aligned across the pillow and spaced the quilting 1/4" apart using my piecing foot.  Does this qualify as matchstick?  I was tempted to go again between the lines at 1/8" but really I thought this little project didn't need anymore.  I really like the texture it creates.


For the other small cushion I straight line quilted it vertically using the seams to keep my quilting lines straight. 

This one looks overstuffed for a very good reason!  Wilbur the wrecker was left dozing on the sofa while I was happily in the kitchen quilting straight lines.  Believing the happy hound to be asleep, I didn't hear him ripping apart my 16" cushion insert!  Stuffing everywhere, it was unrepairable, so wanting to see my cushion completed I've stuffed it with a 17" or 18" insert.  It is a bit much and I'll have to buy a 16", I think!


For the last cushion I wanted to try spiral quilting.  I've not used this technique before and having watched Jacquie Gering's lesson on Craftsy I thought I'd give it a try. 


Suzanne from our Thursday night sewing group (which we are now calling Just Threads!) gave us all a gift of a protractor and I thought it would be perfect to get my spiral going.  Thanks Suzanne!


I marked my first line in chalk and then picked a point to veer away for the second.  Using the 1/4" piecing foot I kept the spiral line on the edge and turned clockwise which kept the bulk of the quilt moving away from the needle and not bunching up in the throat space.


Even for this 24" cushion top, it took a bit of time and my right hand was constantly turning the quilt.  It got a lot easier as the circle got bigger.  If I were to do this on a full size quilt I'd space it out more maybe 1" to 2".  1/4" is nice on this size but used a lot of thread!


I did make a mistake on starting.  In my enthusiasm to get going I just got stuck in.  I should have started at a seam but I started in the middle of a pieced section and tried to resew it later.  It's not as smooth as it could be.


But not that noticeable in the finished cushion as a whole so I'm living with it.  Lesson learned for next time!


I had great fun with the backing!  This fabric is from Ikea and I think its meant for kids to colour in with fabric markers but I just like it a lot.  There's a lot of variation in it from windmills to sea creatures.


I cut the backs 2 pieces at 24.5" x 18" for the larger cushion and 16.5" x 12" for the smaller cushions and used 0.5" seam allowance to make the envelope backs. 


I used this piece for the back of one of the smaller cushions.  There's even a little dog with a kennel almost as cool as Wilbur's!  I love this farbic.


Speaking of dogs, photo bombed by Charly.  Can I ask Gordon to cut the grass so you can find your ball?  Sure, no problem pal!  (I've got hayfever and that's the story I'm sticking to!)

I really enjoyed this project and of the three the purple spiral trail is probably my favourite as you can guess from the amount of photos!  I made mine kind of improv with 1.5" strips up to 5" until it was 19.5" square and then framed with a 3" border.  I'm working on a pattern but the piecing went together like this if you want to try it yourself!


linking up with Crazy Mom Quilts and
Related Posts Plugin for WordPress, Blogger...